こんにちは、しのです。

Shopifyのブログ記事をliquidでカスタマイズしたいんですけど、どうやってやればいいでしょうか?
本日は上記のような疑問を解決する内容となっています

しの
ブログ詳細に更新日を記載する
修正するファイルはmain-article.liquidとなります。
その中に以下の記述があるかと思います。
{%- if block.settings.blog_show_date -%}
  <span class="circle-divider caption-with-letter-spacing">
    {{- article.published_at | time_tag: format: 'date' -}}
  </span>
{%- endif -%}
こちらを以下のように記載してあげましょう。
          {%- if block.settings.blog_show_date -%}
            <span class="circle-divider caption-with-letter-spacing">
              投稿日: {{- article.published_at | date: '%Y年%m月%d日' -}}
            </span>
          {%- endif -%}

          {%- if article.updated_at != article.published_at -%}
            <span class="circle-divider caption-with-letter-spacing">
              更新日:{{ article.updated_at | date: '%Y年%m月%d日' }}
            </span>
          {%- endif -%}
article.updated_at != article.published_at で、更新があったときは更新日が表示されます。
※更新が投稿日と同日であれば同じ日が投稿されます。
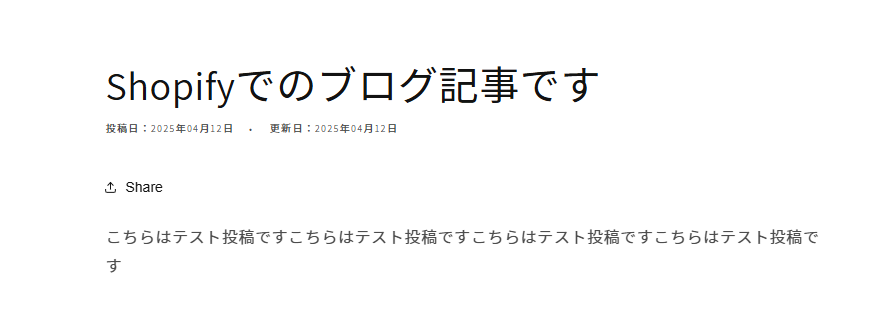
無事に上記のように更新日が表示されました。
パンくずリスト追加する
SEO的にも、UX的にもパンくずリストは欠かせませんが、Shopifyのテーマにはデフォルトでパンくずリストが入っていないテーマもあります。
そういった場合にどのように追加するかを見ていきましょう。
  <nav class="breadcrumb" aria-label="Breadcrumb" itemscope itemtype="https://schema.org/BreadcrumbList">
    <span itemprop="itemListElement" itemscope itemtype="https://schema.org/ListItem">
      <a itemprop="item" href="{{ routes.root_url }}">
        <span itemprop="name">ホーム</span>
      </a>
      <meta itemprop="position" content="1" />
    </span>
    <span class="breadcrumb-separator">/</span>
    <span itemprop="itemListElement" itemscope itemtype="https://schema.org/ListItem">
      <a itemprop="item" href="{{ blog.url }}">
        <span itemprop="name">{{ blog.title }}</span>
      </a>
      <meta itemprop="position" content="2" />
    </span>
    <span class="breadcrumb-separator">/</span>
    <span itemprop="itemListElement" itemscope itemtype="https://schema.org/ListItem">
      <span itemprop="name">{{ article.title }}</span>
      <meta itemprop="position" content="3" />
    </span>
  </nav>
ブログ詳細に関しては上記のコードを追加すればOKです。
任意の場所に追加し、適宜CSSなどで見た目の調整を行いましょう。
目次を付ける
次は目次を付与してみましょう。
<div class="article-toc">
  <strong>目次</strong>
  <nav id="toc"></nav>
</div>
上記のコードを以下の場所に設置してみます。
      {%- when 'content' -%}

        <div
          class="article-template__content page-width page-width--narrow rte{% if settings.animations_reveal_on_scroll %} scroll-trigger animate--slide-in{% endif %}"
          {{ block.shopify_attributes }}
        >
          <div class="article-toc">
            <strong>目次</strong>
            <nav id="toc"></nav>
          </div>
          {{ article.content }}
        </div>
そして肝心の見出しはJSで取得して表示する実装方針です。
以下を任意のJSディレクトリに設置するか、手っ取り早く実装するならmain-article.liquidに設置しましょう。
 <script>
    document.addEventListener('DOMContentLoaded', function () {
      const toc = document.getElementById('toc');
      const headings = document.querySelectorAll('.article-template__content h2, .article-template__content h3');

      if (!headings.length) return;

      const tocList = document.createElement('ul');

      headings.forEach(function (heading, index) {
        const anchorId = 'heading-' + index;
        heading.id = anchorId;

        const tocItem = document.createElement('li');
        tocItem.style.marginLeft = heading.tagName === 'H3' ? '20px' : '0';

        const tocLink = document.createElement('a');
        tocLink.href = '#' + anchorId;
        tocLink.textContent = heading.textContent;

        tocItem.appendChild(tocLink);
        tocList.appendChild(tocItem);
      });

      toc.appendChild(tocList);
    });
    </script>
最後にCSSで簡単に見た目を整えておきましょう。
.article-toc {
  background: #f9f9f9;
  padding: 15px;
  margin-bottom: 30px;
  border: 1px solid #ddd;
}

.article-toc ul {
  list-style: none;
  padding-left: 0;
}

.article-toc li {
  margin-bottom: 5px;
}

.article-toc a {
  text-decoration: none;
  color: #007bff;
}

.article-toc a:hover {
  text-decoration: underline;
}
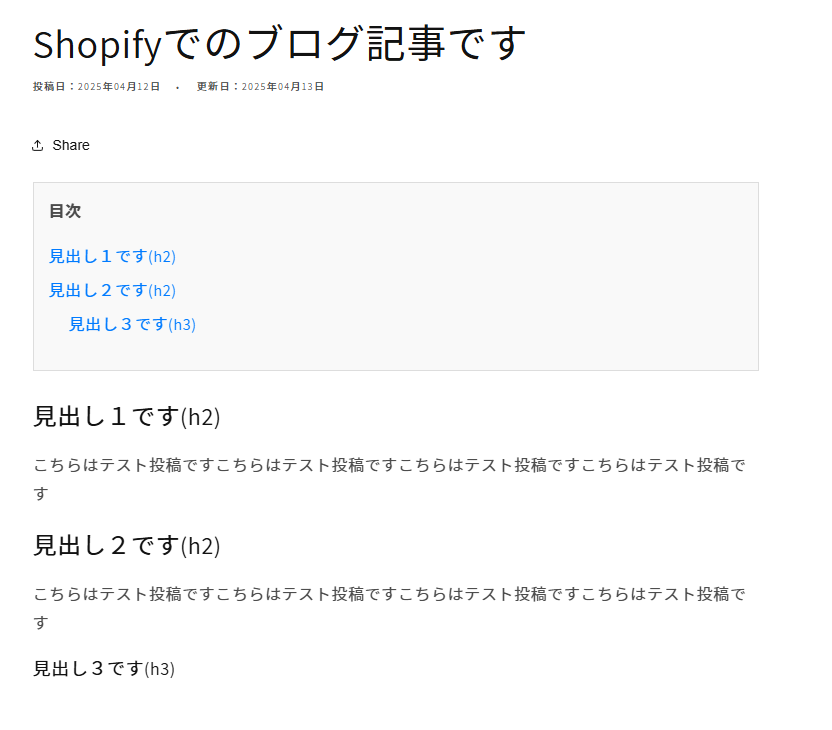
こちらで以下のような目次を生成することが出来ました。
CSSを当てることで更に見た目の改善をすることが出来ます。